5
The Producer
An overview of the Producer
The Producer page is the primary page where you’ll work on your book’s content. When you write in the Producer page, your changes are saved automatically. The parts of the page are described below.
The top navigation bar includes:
-
a link to the Dashboard page (leftmost)
-
a link to the Preview page
-
a ‘Share’ button to give other users access to the book
-
a settings button (cog icon) to access the book settings
-
a button with your user initials where you can sign out (rightmost).
The left sidebar includes:
-
the title of your book
-
a button to open the Book Metadata modal. Here you can edit the book’s title and other metadata.
-
the list of chapters in your book. The initials of the book member who is currently editing the chapter will be displayed next to the title.
-
a button to add new chapters (the ‘+’ icon)
-
a button to upload new chapters in the form of Word docx files (the cloud upload icon).
The editor includes:
-
the space where you’ll write your content
-
the toolbar that you’ll use to format your content.
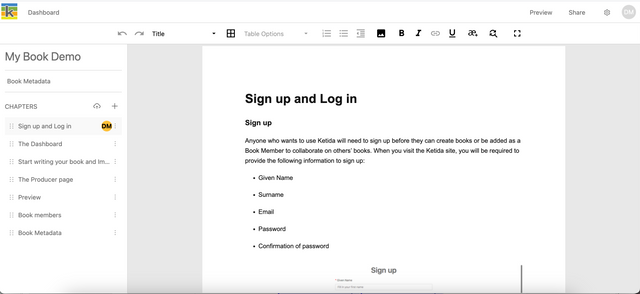
The Producer page
Start writing or upload chapters
On the Producer page, you can add more chapters to your book by choosing to either create a new chapter or upload an existing chapter as a Word docx file.
Adding new chapters to your book:
-
Create a new chapter: click the ‘+’ button in the chapter list on the left of the page, then select the ‘Untitled Chapter’ to open it.
-
Upload an existing chapter: click the cloud upload icon from the left sidebar, and choose a file from your file browser. Select the chapter to open it. Your heading formatting and images from the uploaded document will be preserved.
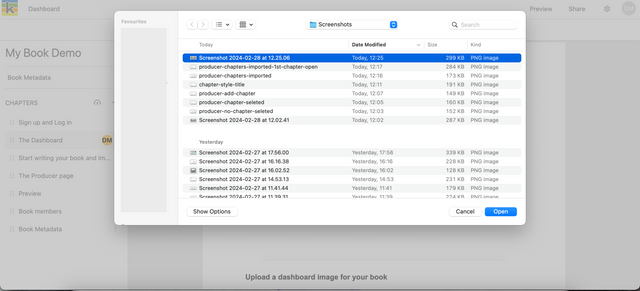
Uploading an existing chapter to your book
Format and insert content using the toolbar
Formatting is applied to text by selecting the text, and then selecting the relevant tool from the toolbar.

The editor toolbar
In the toolbar the following tools are available (from left to right):
-
Undo (left arrow): used to undo a change
-
Redo (right arrow): used to redo a change that was undone
-
Text styles: including heading levels (title, heading 2, heading 3) and body text styles (paragraph, block quote)
-
Ordered (numbered) list: two levels of lists can be created. Tip: to create a nested list, select the list item you want to nest, then click the ordered list button again.
-
Unordered (bulleted) list: two levels of lists can be created. Tip: to create a nested list, select the list item you want to nest, then click the ordered list button again.
-
Remove indent: to remove an indent on text or list items
-
Upload image: to upload an image, place your cursor in the position you want the image to appear, and click the upload image icon.
-
Bold: to apply bold to text
-
Italic: to apply emphasis to text
-
Hyperlink: enter your link in the input field and click Apply. Tip: links should be valid and include ‘https://’ to produce valid epubs.
-
Underline: to apply underline to text
-
Special characters: to insert a special character, place your cursor in the position you want it inserted, then click the special characters icon. Browse or search in the menu to find the character, then select it. The selected character will be inserted by your cursor.
-
Find and replace: To find text in your chapter, click the find icon and enter the search item. Positive matches are shown in green in the text. You can cycle through results using the next and previous arrows. You can change case sensitivity using the `Tt` icon. To find and replace, click the three horizontal dots next to the find bar, enter the search item and the replace item, navigate to the result you want to replace using the previous and next arrows or choose to replace all. Select the Case Sensitive checkbox if your search should only match the case of the text input into the Find text input area. Replacement text will always use the exact case input into the ‘Replace text’ input area.
-
AI pen: to get AI assistance when you write. To use the prompt select some text in your chapter, then select the AI pen icon. This will show the prompt input area to type your prompt. After the response is generated, you can choose to ‘Replace selected text’, ‘Insert’ or ‘Discard’. See the ‘Write with AI assistance’ section below for information on setting up AI use in your book.
-
Full-screen: to enter full-screen mode, click this icon. To exit full-screen mode, click it again.
Image support
Supported image files include JPEG, PNG, SVG, and TIFF. TIFF files are converted by Ketty to different formats for performance reasons, and in Epub and PDF exports the size optimised versions of an image are used. Once inserted, you can add a caption and alt text to the relevant input areas that appear below the image. To delete the image, double-click on it and hit backspace.
Write with AI assistance
The book owner can choose when book collaborators with edit access can use AI prompts to assist their writing. The book owner can change the AI use per book at any time, making the use of AI prompts flexible yet controlled. Note: Your Ketty instance needs to be configured with an AI key on the Admin Dashboard before this functionality can be used.
Setting AI-use for your book:
-
Enable AI-use: open Book Settings (cog icon) and turn on the ‘Use AI’ setting. This adds the AI pen icon to the editor toolbar.
-
Disable AI-use: open Book Settings (cog icon) and turn off the ‘Use AI’ setting. This removes the AI pen icon from the editor toolbar.

Enable or disable AI-use in book settings
Collaborate on books
While collaborating on books, only one person can edit a chapter at a time. When someone is working on a chapter their initials will display next to the chapter name, indicating that they have locked that chapter. Others will be able to read the chapter, but won’t be able to make changes at the same time to avoid conflicting edits.

The initials next to the first chapter title indicate the user who is currently editing the chapter.
See the Book Collaborators chapter for more information.